Hardware Component
Here we discuss how to build a custom hardware plug-in for ScopeFoundry. If one is not available in our list of plug-ins, you can build one based on this tutorial.
Goals:
- Learn basic concepts of
ScopeFoundry.HardwareComponent. - Create a
HardwareComponentplugin - a virtual sine wave generator. Virtual because we simulate values instead of connecting to an actual device. - Learn how to add the component to your app.
Tips to create the low-level interface that connects to an actual device see here.
The Template
To get started, in your Anaconda prompt or terminal, navigate to your folder and run the ScopeFoundry tools:
# cd "to/your_project_folder"
conda activate scopefoundry
python -m ScopeFoundry.tools
Fill out the new hardware tab as shown below and hit create new hardware button:
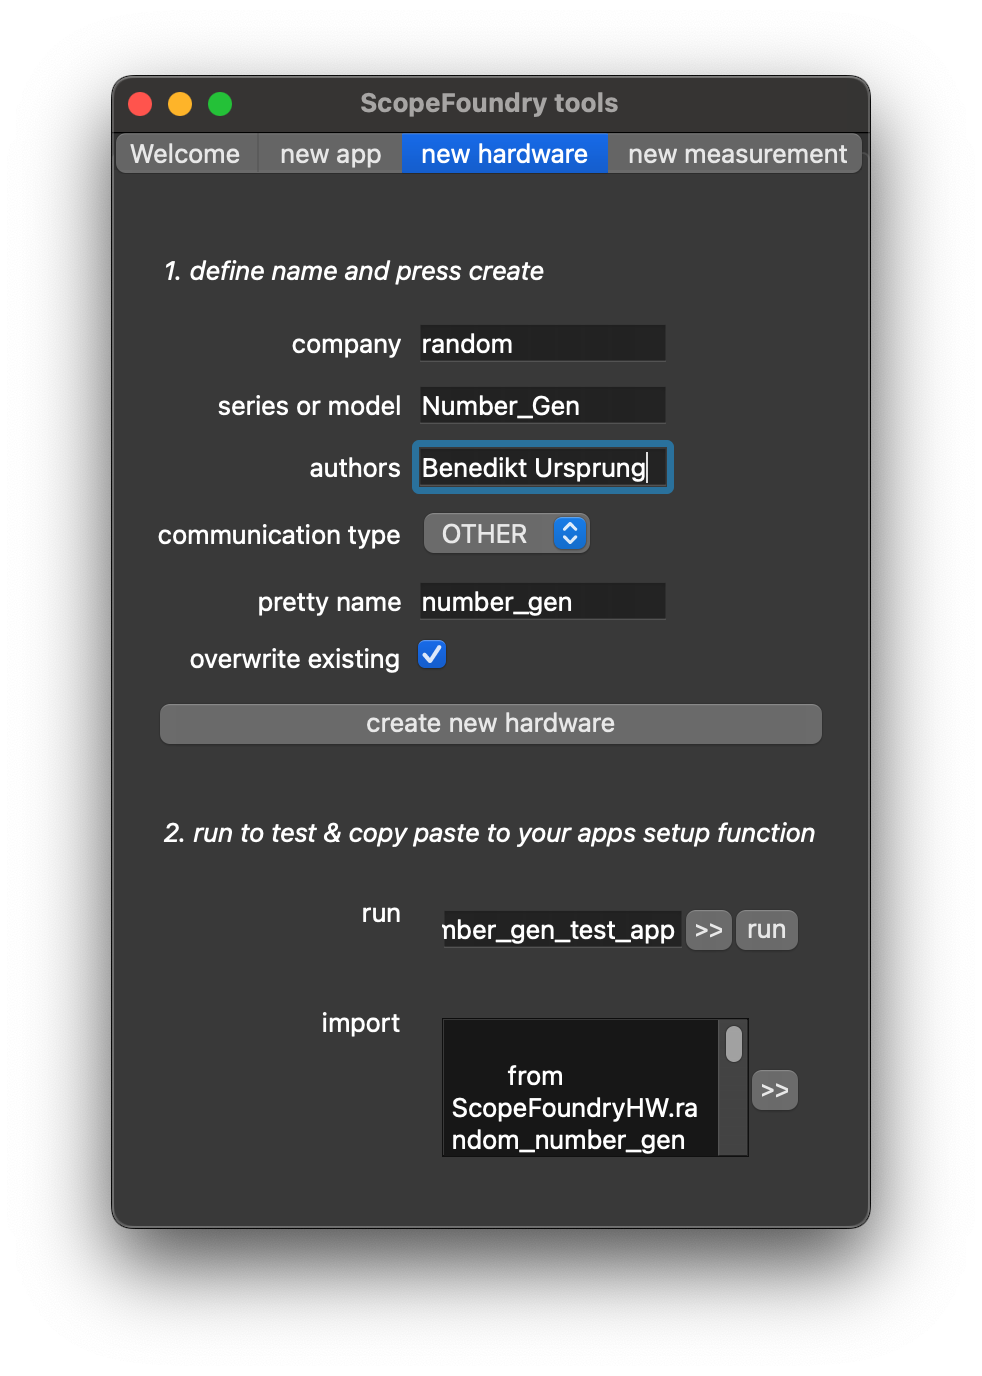
Note that this generates the required files in your ScopeFoundryHW folder. You can copy the content of the import statements into your fancy_app.py file. If you used the values entered above, your fancy_app.py should look like this:
# fancy_app.py
import sys

from ScopeFoundry import BaseMicroscopeApp


class FancyApp(BaseMicroscopeApp):

    name = "fancy app"

    def setup(self):

        from ScopeFoundryHW.random_number_gen import (NumberGenHW,
                                                      NumberGenReadout)
        self.add_hardware(NumberGenHW(self))
        self.add_measurement(NumberGenReadout(self))

if __name__ == "__main__":
    app = FancyApp(sys.argv)
    # app.settings_load_ini("default_settings.ini")
    sys.exit(app.exec_())
From here, in general, two files in ScopeFoundryHW/random_number_gen are important and will be modified to complete Part 1:
Low-Level Interface: number_gen_dev.py
This file handles the low-level communication with the hardware. This file is independent of ScopeFoundry. It is not strictly required, especially when the hardware seller already provides a Python interface module or library. It is useful in conjunction with the required ScopeFoundry.HardwareComponent as it allows HardwareComponent to delegate functionalities.
For this tutorial, this file will be provided and simulates a connection to a wave function generator. In Part 2, we provide tips on how to write this in practice.
Replace the content of random_gen_dev.py with the following:
# number_gen_dev.py
import time

import numpy as np

class NumberGenDev:

    """
    This is the low-level dummy device object.
    When instantiated, it would connect to the real-world device.
    Methods allow for device read and write functions.
    """

    def __init__(self, port=None, debug=False):
        """We would connect to the real-world device here
        if this were a real device.
        """
        self.port = port
        self.debug = debug
        print("NumberGenDev: Connecting to port", port)
        self.write_amp(1)


    def write_amp(self, amplitude):
        """
        A write function to change the device's amplitude.
        Normally, this would talk to the real-world device to change
        a setting on the device.
        """
        self._amplitude = amplitude

    def read_rand_num(self):
        """
        Read function to access a random number generator.
        Acts as our scientific device picking up a lot of noise.
        """
        rand_data = np.random.ranf() * self._amplitude
        return rand_data

    def read_sine_wave(self):
        """
        Read function to access a sine wave.
        Acts like the device is generating a 1Hz sine wave
        with an amplitude set by write_amp.
        """
        sine_data = np.sin(time.time()) * self._amplitude
        return sine_data

if __name__ == '__main__':
    print('start')
    dev = NumberGenDev(port="COM1", debug=True)
    print(dev.read_sine_wave())
    print('done')
Comments:
When we create an instance of this device class, we begin communication with the device. Other methods (typically with names starting with read_ or write_) handle sending data back and forth to the device.
In this case, we defined a method read_rand_num that returns a number. Because we are not actually connecting to a device, we just return a value from a random number generator from NumPy. This function is referenced in the hardware plugin section below.
We also define a write_amp function that takes a value as input and (in practice) would write it to the device.
If you would like to connect to real scientific equipment and define basic functions based on its communication protocol, we recommend the following:
- Define whichever addresses and ports you would like to use as variables in the module’s
__init__()method. - Then define a write function that can send messages to the device over RS232, Ethernet, via DLL, or other protocols as required.
The Actual ScopeFoundry Hardware Plug-in
The next step is to create a subclass of ScopeFoundry.HardwareComponent that will be added to the app. It defines the settings of a hardware component in the app and links them to the low-level functions (typically defined in the _dev file) at connection.
The required methods are: setup(), connect(), and disconnect().
# number_gen_hw.py
from ScopeFoundry.hardware import HardwareComponent


class NumberGenHW(HardwareComponent):

    name = "number_gen"

    def setup(self):
        s = self.settings
        s.New("port", str, initial="COM1", description="has no effect for this dummy device")
        s.New("amplitude", float, initial=1.0, ro=False)
        s.New("rand_data", float, initial=0, ro=True)
        s.New("sine_data", float, initial=0, ro=True)

    def connect(self):
        from .number_gen_dev import NumberGenDev

        s = self.settings
        self.dev = NumberGenDev(s["port"], debug=s["debug_mode"])

        # Connect settings to hardware:
        s.get_lq("amplitude").connect_to_hardware(write_func=self.dev.write_amp)
        s.get_lq("rand_data").connect_to_hardware(read_func=self.dev.read_rand_num)
        s.get_lq("sine_data").connect_to_hardware(read_func=self.dev.read_sine_wave)

        # Take an initial sample of the data.
        self.read_from_hardware()

    def disconnect(self):
        if not hasattr(self, "dev"):
            return

        self.settings.disconnect_all_from_hardware()
        del self.dev

    # To continuously update settings implement *run* method
    # def run(self):
    #     self.settings.property_x.read_from_hardware()
    #     time.sleep(0.1)
Explanations:
- Class: We make our module a subclass of
HardwareComponent.setup():- Here we set up a few settings for this hardware. These settings are
LoggedQuantityobjects that keep this value in sync between hardware and the app.
- Here we set up a few settings for this hardware. These settings are
connect():- We instantiate the low-level device wrapper
self.dev. This wrapper establishes a connection to the device and provides method to communicate with the device. - Using
connect_to_hardware(), we associate a setting to functions that handle the comunication with the hardware.
- We instantiate the low-level device wrapper
disconnect():- We clean up by removing objects after use. We want to be able to reconnect to the device.
By having connect() and disconnect(), we can cleanly reconnect hardware during an app run. This is especially useful when debugging a hardware plug-in for a new device.
The Final Result
Test by running:
python fancy_app.py
You should see:

Next steps
- Note that we have implicitly created and added a measurement to the app.
number_gen_readoutis not working yet; this will be part of the next tutorial. - You can access the code for this tutorial here.